How to Vectorize an Image in Canva?
If you've ever tried to resize an image only to find it becoming blurry or pixelated, you've encountered one of the main reasons designers love vector graphics. In this article, we'll explore how to work with vector-like elements in Canva, understand its limitations, and discover why additional tools like vectorizer.kiwi might be necessary for true vectorization. Let’s dive in!
Understanding Vector Graphics
Vector graphics are images created using mathematical formulas instead of pixel grids. This means they can be scaled to any size without losing quality - a crucial feature for logos, illustrations, and designs used across various media. Whether you're creating a business card or a billboard, vector graphics ensure your design stays crisp and clear.
The infinite scalability means you never have to worry about losing detail or clarity. Imagine laying out a small icon and knowing it can be blown up to the size of a bus without any degradation. That's why vectors are the gold standard for professional design work.
Canva's Approach to Vector-like Graphics
Canva, a popular design tool, offers several features that mimic vector graphics. However, it's important to recognize that Canva isn't a full-fledged vector graphics software.

What Canva Can Do
Canva provides a range of vector elements and icons that you can resize without quality loss. The platform’s extensive library of shapes, lines, and icons functions much like vector graphics. You can also create basic shapes that behave similarly to vector graphics and combine them for more complex designs. Text in Canva maintains its crispness when scaled, acting much like vector text.
Furthermore, Canva supports the import of SVG files, which are true vector graphics. This can be particularly useful if you've created vector elements in other programs and wish to incorporate them into your Canva design.
Canva's Limitations
While Canva is versatile, it has some constraints when it comes to vector graphics:
- No true vectorization: Canva can't convert existing raster images (like JPEGs or PNGs) into vector format. This limits its ability to handle tasks that require high scalability.
- Limited editing: Complex vector graphics can be challenging to edit within Canva. You might find yourself missing the detailed control that specialized vector software provides.
- No tracing tools: Unlike specialized vector software, Canva doesn't offer tools to trace raster images into vector paths. Tools like Adobe Illustrator have robust tracing options that are simply not present in Canva.
These limitations can be frustrating if you need to convert detailed images into vectors or require more advanced editing capabilities.
A Better Alternative: vectorizer.kiwi
When you need to turn a regular image into a scalable vector graphic, vectorizer.kiwi steps up to the plate. This tool is user-friendly, efficient, and free.
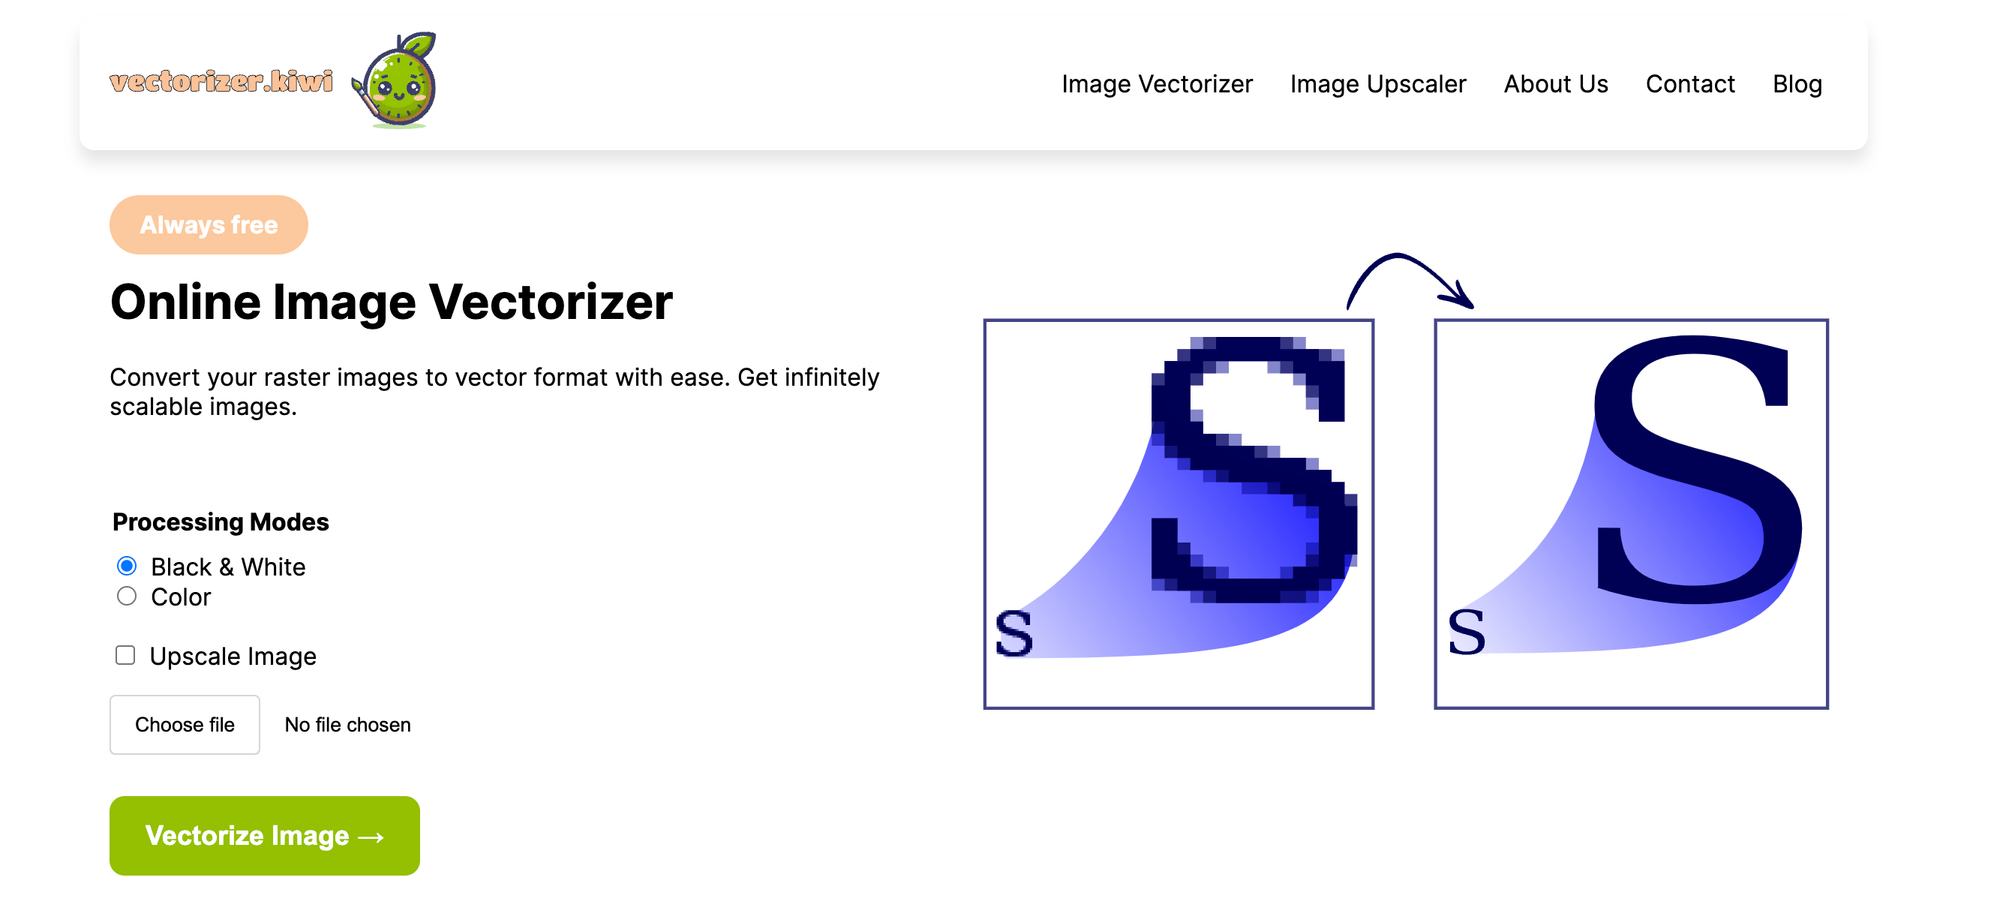
Here's how it works:
- Visit vectorizer.kiwi in your browser.
- Upload your image: Drag and drop your image, or use the upload button.
- Automatic vectorization: The AI-powered tool processes and converts your image to vector format.
- Download your vector graphic as an SVG file.
What makes vectorizer.kiwi stand out is its ease of use, speed, and quality of output. The tool can handle complex images, preserving detail and ensuring that edges are clean and sharp. Plus, it's completely free, with no need for software installation.
Combining Tools for the Best Results
To get the most out of both platforms, consider this workflow:
- Use vectorizer.kiwi to convert your raster images to SVG format.
- Import the SVG files into Canva. Canva supports SVG files, so this step integrates seamlessly.
- Design with confidence, knowing that your graphics can be scaled to any size without loss of quality.
This approach allows you to leverage Canva's ease of use and extensive design features while still working with high-quality vector elements. You get the best of both worlds: Canva’s intuitive design environment and vectorizer.kiwi’s powerful vectorization capabilities.
Additional Tips for Working with Vector Graphics
- Stay Organized: When working with multiple vector elements, keep your layers organized. This makes it easier to edit individual components without disrupting the entire design.
- Use High-Quality Source Images: The better the quality of your raster image, the better the vectorization result. Clear, high-resolution images make the conversion process more accurate and less time-consuming.
- Experiment with Settings: When using vectorizer.kiwi, don't hesitate to experiment with the settings to find the best balance between detail and simplicity for your specific image.
Conclusion
While Canva is a fantastic tool for many design tasks, it has its limitations when it comes to true vector graphics. By recognizing these constraints and knowing when to use specialized tools like vectorizer.kiwi, you can ensure your designs look great at any scale.
Remember, the key to great design often lies in using the right tool for the job. Don't be afraid to step outside of a single platform to achieve the best results. With this combined approach, you're well-equipped to create designs that are both beautiful and infinitely scalable.