How to Vectorize an Image without Illustrator?
Vectorizing images is essential for designers and digital artists, ensuring that graphics maintain their quality at any scale.
While Adobe Illustrator is a popular tool for this process, it’s not the only option. vectorizer.kiwi offers a powerful, user-friendly alternative for free.
Let’s explore how you can easily convert images to vector format without using Illustrator, focusing on the benefits and process of using vectorizer.kiwi.
Understanding Vector Images
To start, it’s essential to grasp the distinction between raster and vector images. Raster graphics, such as .jpg and .png files, are composed of pixels and can become pixelated when scaled.
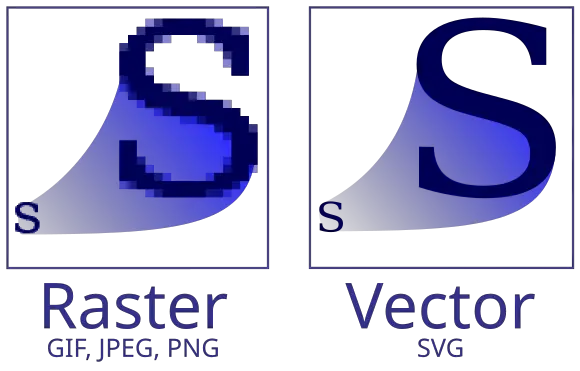
Vector graphics, however, are made of mathematical equations that define shapes, lines, and colors, allowing them to be scaled infinitely without any loss of quality.
The Importance of Vector Images
Vector images are indispensable in various fields, particularly in branding, printing, and web design. Here’s why:
- Infinite Scalability: Perfect for everything from business cards to billboards.
- Easy to Edit: Modify and customize your designs effortlessly.
- Efficient Storage: Smaller file sizes compared to high-resolution raster images.
Step-by-Step Guide to Vectorizing Without Illustrator
Leverage vectorizer.kiwi for Instant Conversion
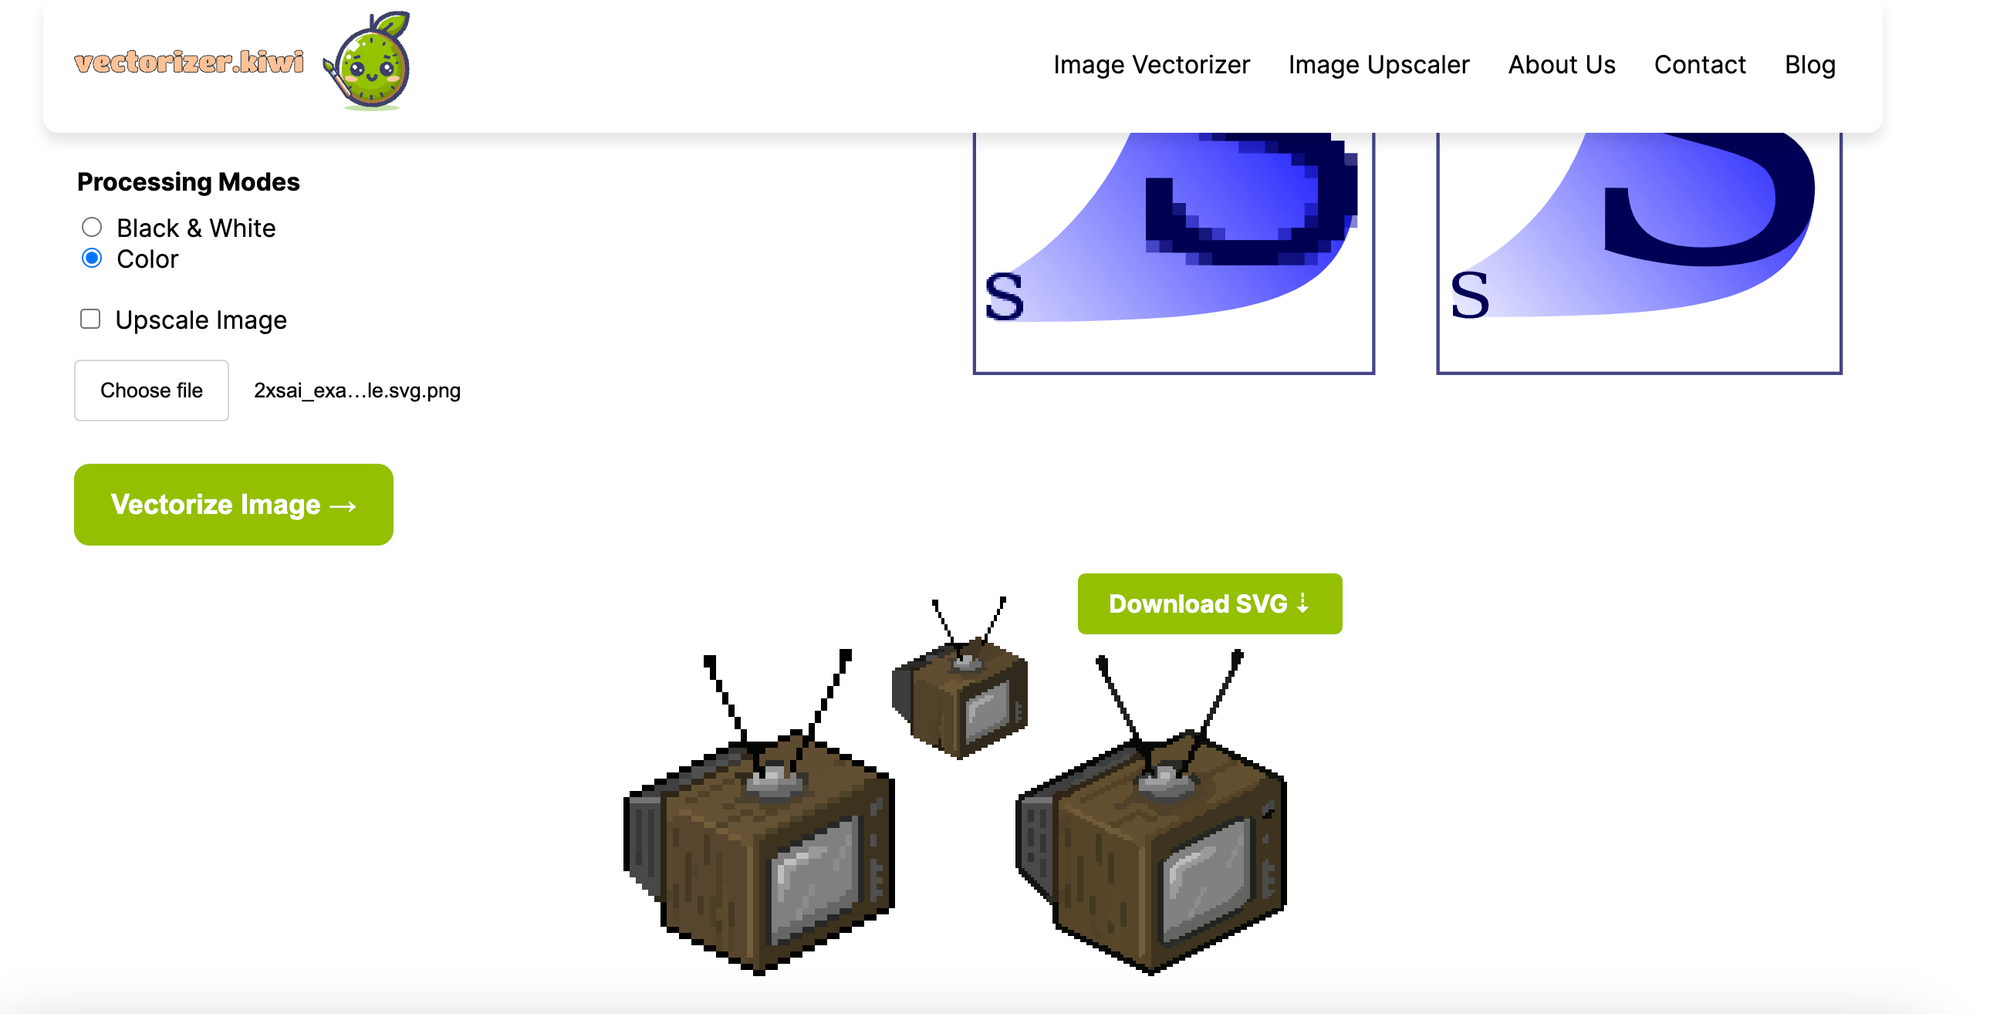
The easiest way to vectorize an image is by using vectorizer.kiwi, an AI-powered tool designed for high-quality vector conversions.
Here’s how:
- Upload Your Image: Navigate to vectorizer.kiwi and upload your raster image file.
- Automatic Processing: The AI analyzes and converts the image to a vector format, preserving intricate details.
- Download Your Vector Image: Once processed, download your vector graphic in .svg format.
Advantages of vectorizer.kiwi:
- Rapid Processing: Converts images quickly.
- High-Quality Output: Ensures professional-grade vector graphics.
- Ease of Use: Intuitive interface with no learning curve.
- Web-Based: No need to install software.
- Handles Complexity: Ideal for detailed designs and logos.
Manual Vectorization Using Free Software
For those who prefer manual control, tools like Inkscape offer a free alternative. Although more time-consuming, this method provides a hands-on approach:
- Open Image in Inkscape: Import your raster image into Inkscape.
- Use Trace Bitmap Tool: Convert the image into vector paths using the trace tool.
- Edit Paths: Fine-tune the paths and shapes manually.
- Export as SVG: Save your new vector file.
- Exploring Free Online Tools
There are various free online tools for vectorization, though they often lack the precision and quality of vectorizer.kiwi. Many of these tools introduce artifacts or have limitations on file size and types.
Additional Tools and Techniques for Vectorization
Beyond the methods mentioned, other tools and techniques can assist in the vectorization process. Some advanced tools offer additional features that might be beneficial for specific projects:
- CorelDRAW: Another professional graphic design software offering vectorization features.
- GIMP with Path Tool: Use the GNU Image Manipulation Program’s path tool to manually trace and create vectors.
- Autotracer: A free online tool that offers basic vectorization, suitable for simpler images.
Comparing Different Vectorization Tools
When choosing a vectorization tool, it’s crucial to compare the features, ease of use, and output quality:
- vectorizer.kiwi: Offers AI-powered, high-quality conversions with a user-friendly interface and no software installation, for free.
- Adobe Illustrator: Highly powerful but requires a subscription and steep learning curve.
- Inkscape: Free and open-source, but requires manual effort and some expertise.
- Online Free Tools: Often limited in quality and functionality, but useful for quick, simple tasks.
Tips for Successful Vectorization
- Choose Clear Images: Simple images with few colors vectorize best.
- Zoom In for Details: When manually tracing, zoom in for better accuracy.
- Utilize AI Tools: Save time and effort with AI-powered tools like vectorizer.kiwi.
- Refine Manually if Needed: After auto-conversion, refine the vector paths for perfection.
Why vectorizer.kiwi is the Best Choice
For superior vector conversion, vectorizer.kiwi stands out due to its advanced AI technology and user-friendly design. It ensures that your images are not only converted but also enhanced during the process.
With vectorizer.kiwi, you can:
- Convert Multiple Formats: Supports various raster image types.
- Enhance Quality: AI enhances image quality during conversion.
- Save Time: No need for manual tracing or expensive software.
- Achieve Professional Results: Consistent high-quality output.
Whether you’re an experienced designer or just starting out, vectorizer.kiwi offers a straightforward and efficient solution for all your vectorization needs. Try it today and see the difference AI-powered vector conversion can make!